Nmap Commands Every Security Team Should Know

Table of contents
Security teams map networks every day, but the work rarely feels simple. You’re dealing with assets that appear, disappear, or sit half-configured in a forgotten environment. You’re trying to understand which ports are open, which services are answering, and whether those answers match the inventory you think you have.
This is where Nmap, the open-source network mapper, continues to earn its place. It’s lightweight and reliable. And when used correctly, Nmap scripts become one of the most efficient network scanning tools for threat intelligence, vulnerability scanning, and network reconnaissance.
What Nmap is and why teams rely on it
Nmap is short for ‘network mapper.’ It began as a simple port scanner. Today, it’s a feature-rich engine capable of host discovery, OS identification, service fingerprinting, vulnerability checks, and more.
Only 45% of businesses perform logging and monitoring; representing a major vulnerability for those who do not track their security footprint.
Analysts use Nmap security scanning tools to:
- Validate what an attacker could see on the public-facing perimeter
- Map internal networks to support incident response and threat hunting
- Confirm which services are actually running versus what asset databases list
- Support network security audits by verifying firewall behaviour and segmentation
Most importantly, Nmap techniques help ground your decisions in observable data. When everything feels abstract, such as cloud subnets, proxy rules, and ephemeral workloads, Nmap brings it back to packets and answers.
With Nmap security, either a port responds or it doesn’t. Either the version matches your hardened baseline or it doesn’t.
Before we begin: Your Nmap glossary
If you’re new to Nmap functionality, here’s a quick glossary of terms that you may see often. If you’re already confident, you can skip ahead to the next section.
- ACK scan: A technique (
sA) used to test firewall behaviour. Helps determine whether packets are being filtered, dropped, or allowed through. - Asset discovery: The process of finding active hosts on a network. Nmap performs this via ping sweeps, ARP requests, and other host discovery methods.
- Command line: The text-based interface where you type Nmap commands.
- DNS resolution: The process of converting a domain name (like
example.com) into its corresponding IP address. Nmap performs DNS resolution before scanning unless you disable it (n). It helps ensure you’re targeting the correct host. - Filtered port: The specific port didn’t respond because something blocked the request. Often indicates a firewall or ACL rule in place.
- Host discovery (ping scan): Nmap’s initial step to see if a system is online. The
snflag skips port scanning and only checks reachability. - Hostname: The human-readable name assigned to a device on a network. During a scan, Nmap attempts to identify hostnames linked to IP addresses. Hostnames can provide quick context about what a system is, who owns it, or where it sits within an organisation’s infrastructure.
- Nmap scripting engine (NSE): A framework inside Nmap that runs scripts for authentication checks, configuration reviews, vulnerability detection, and protocol analysis.
- Open port: A port actively accepting connections. This is where attackers usually focus their effort.
- Port scanning: Sending packets to a host to see which ports respond. Helps identify running services and potential vulnerabilities.
- Service detection: Nmap’s ability to identify which application or version is running on a port. Enabled with
sV. - SYN scan: The default and most common scan type (
sS). Sends SYN packets to identify open ports without completing the full TCP handshake. - TCP ACK: A TCP packet flag that confirms receipt of data. In Nmap scans, sending ACK packets helps determine how a firewall filters traffic. It doesn’t reveal open ports, but it shows whether packets are allowed, blocked, or silently dropped.
- TCP ports: Logical communication endpoints used by applications to send and receive data over the TCP protocol. Each port is associated with a specific service (such as 22 for SSH or 443 for HTTPS). When Nmap scans TCP ports, it checks which ones respond and what services are listening behind them.
- TCP SYN: A type of TCP packet used to start a connection. Nmap’s SYN scan (
sS) sends these packets without completing the full handshake, making the scan fast and less intrusive. If a port replies withSYN-ACK, Nmap knows the port is open; if it sendsRST, it’s closed. - Trace route: Maps the network path packets take to reach the target. Used to understand routing, proxies, and segmentation.
- UDP scan: A slower but necessary scan type (
sU) to detect services like DNS, NTP, and SNMP. - Verbosity: A setting that tells Nmap how much detail to display during a scan. Increasing verbosity (
vorvv) reveals more information about packets sent, responses received, and scan progress. - Version detection: Identifies the specific service version running on an open port. Helps prioritise patching and vulnerability assessments.
Here’s a quick video that breaks down the basics of Nmaps.
How Nmap supports threat intelligence and OSINT
An OSINT framework gives you a view of your digital footprint from the outside. Nmap shows you what happens when someone interacts with that footprint.
Supply-chain incidents such as the Shai-Hulud malware compromise in the NPM ecosystem highlight how exposed services and overlooked dependencies become entry points.
Pairing passive OSINT with active Nmap scanning helps analysts:
- Confirm whether internet-facing assets expose unnecessary ports
- Detect forgotten or shadow infrastructure
- Understand attacker paths from reconnaissance through exploitation
- Validate the findings surfaced by external attack surface monitoring
If your team already uses OSINT tools for domain discovery, leaked data monitoring, or code exposure analysis, adding Nmap commands closes the loop. You’ll get a clearer, more reliable picture of how your organisation appears to a threat actor during early reconnaissance techniques.
Here are some beginner-friendly commands you can try out with Nmap.
Core Nmap scanning techniques explained
Nmap’s strength lies in its flexibility. Once you understand the scan types, you can mix and match them to fit almost any scenario. Here are some of the key Nmap functions that you should know.
1. Host discovery
This phase checks whether a target is online. Examples:
nmap -sn 10.0.0.0/24– Ping sweep to find active hosts.nmap -Pn <target>– Skip ping checks when ICMP is blocked.nmap -sn -PR <target>– ARP scan inside local networks.
Host discovery gives you the list of systems you actually need to investigate.
2. Port scanning basics
These commands determine which TCP or UDP ports respond.
nmap -sS <target>– SYN scan (stealthier, fast, widely used).nmap -sT <target>– TCP connect scan (fallback when raw packets aren’t allowed).nmap -sU <target>– UDP scan (slower, but essential for DNS, SNMP, NTP).
Understanding the most common port states (open, closed, filtered, unfiltered) is key. An “open” result signals genuine exposure. And a “filtered” result often points to firewall rules, which can be just as useful when mapping attack paths.
3. Service and version detection
Once you know which ports respond, the next step is for teams and network administrators to check what’s behind them.
nmap -sV <target>– Detects running services and versions.nmap -sV --version-intensity 5 <target>– Performs deeper version probing across a wider range of ports.
This helps analysts spot outdated web servers, weak SSH versions, or unpatched services. It’s a practical way to support downstream vulnerability assessment processes.
4. OS detection
OS fingerprinting can help validate your asset inventory or spot unexpected operating systems. This can confirm whether a device matches the expected configuration baseline before running deeper checks or NSE scripts.
nmap -O <target>– Attempts to identify the host operating system.
Accuracy varies depending on firewalls, proxies, and network noise. But even partial identification helps confirm whether a host belongs where you think it does.
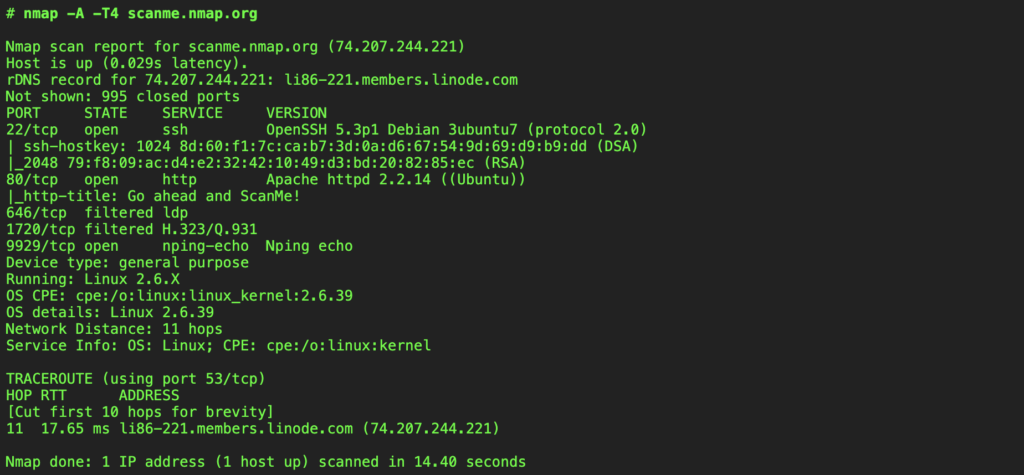
Here’s an example of Nmap commands in action to run OS detection.
5. Script scanning (Nmap Scripting Engine/ NSE)
NSE is one of the most powerful parts of Nmap. NSE scripts automate checks for misconfigurations, weak authentication, protocol quirks, and known vulnerabilities.
Script examples:
nmap --script=vuln <target>– High-level vulnerability overview.nmap --script=http-enum <target>– Enumerates web applications.nmap --script=smb-os-discovery <target>– Useful in Windows environments.
For many teams, NSE bridges the gap between simple port scanning and deeper security testing.
6. Aggressive scanning
This aggressive Nmap mode bundles OS detection, service detection, traceroute, and scripts all into a single command.
nmap -A <target>– Performs full aggressive enumeration.
It’s powerful, but noisy. This approach is best used in controlled, internal testing. It shouldn’t be applied to production environments without clear approval.
Essential Nmap commands by security scenario
Here is a practical cheat sheet that you and your team can return to, whenever you’re mapping your cybersecurity posture.
1. Checking your external attack surface
Here are some Nmap commands which are useful for internet-facing assets.
nmap -sS -sV -T4 <domain>– Scans common TCP ports quickly with service detection.nmap -p 80,443,22 <target>– Checks specific high-value ports.nmap --top-ports 100 <target>– Scans the 100 most frequently used ports.
Use these commands to verify that what’s visible externally matches your intended exposure. It’s common to spot forgotten test servers or admin dashboards left open.
You can also cross-reference this data with an external threat intelligence tool, such as CybelAngel, to ensure that no external vulnerability slips by unnoticed.
2. Internal network reconnaissance
These Nmap commands are helpful during incident response or proactive hardening:
nmap -sn 10.10.0.0/16– Map active hosts.nmap -sS -sV 10.10.5.23– Inspect a suspicious target host.nmap -sU --top-ports 20 <target>– Identify UDP services often used for lateral movement.
This supports threat hunting by revealing unexpected services or changes in normal host behaviour.
3. Firewall and segmentation checks
Firewall behaviour isn’t always obvious from documentation alone. Nmap helps teams validate how packets move through the network in practice, revealing whether filtering rules behave as expected and whether segmentation is genuinely enforced between sensitive zones.
nmap -sA <target>– Tests whether firewall rules drop or allow packets.nmap -Pn <target>– Helps when ICMP is restricted.nmap --traceroute <target>– Maps routing paths through the network.
Teams use these scans to confirm that critical boundaries are intact and to detect gaps where traffic slips through unexpectedly.
4. Compliance and audit workflows
Compliance teams need reliable evidence of what’s running across the network, and Nmap offers a quick way to generate that view. Regular scanning becomes a lightweight way to:
- Verify exposed service versions
- Confirm patching commitments
- Produce evidence for internal audit teams
- Support policy reviews around network mapping and network hardening
Exporting results helps with reporting:
nmap -oX results.xml <target>– Saves results as XML for audit tools.nmap -oN results.txt <target>– Creates a human-readable text report.
These exports make it easier to share findings. They also help organisations maintain a consistent historical record of network exposure, which is often essential for regulatory audits or internal governance reviews.
Figure 6: Some of the most essential Nmap commands. (Source: CybelAngel)
How to interpret Nmap results
Nmap can feel like another language, and the results matter only when analysts interpret them correctly. Here is a quick breakdown of how to scan results from an Nmap command, and understand them.
1. Open vs closed vs filtered
- Open means reachable. This is where attackers focus.
- Closed means nothing is listening, but packets reach the host normally.
- Filtered means a firewall is silently blocking the request.
- Unfiltered means packets reach the port but Nmap can’t confirm its state.
Filtered ports often reveal more about a network’s architecture than open ones. They show where controls exist… and where they don’t.
2. Unusual response behaviour
Look for:
- Services answering on non-standard ports.
- Inconsistent version numbers between internal and external views.
- Hosts that respond differently depending on scan type.
These details help identify spoofing, proxies, or misconfigurations.
3. When to escalate
Escalation makes sense when:
- A critical service is exposed unexpectedly.
- Nmap reveals a version with known CVEs.
- Segmentation controls don’t behave as documented.
- Newly discovered hosts appear on sensitive subnets.
Analysts often pair Nmap findings with threat intelligence feeds to understand whether attackers actively exploit similar configurations.
Quick Nmap tutorial: from installation to your first scan
You can install Nmap on most platforms by visiting Nmap.org and choosing the right version for your system. There are Nmap versions available for macOS, Windows, Linux, and any other OS.
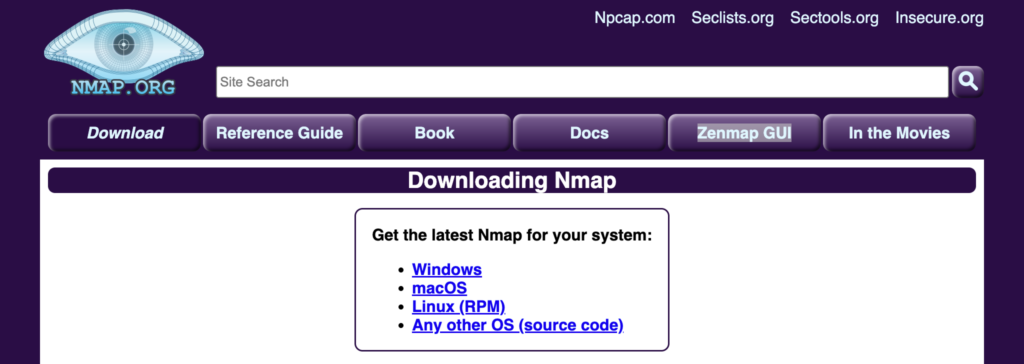
Figure 7: The install page for Nmap. (Source: Nmap.org)
Once installed, a typical workflow looks like this:
- Discover hosts:
nmap -sn 192.168.1.0/24 - Scan ports:
nmap -sS 192.168.1.45 - Identify services:
nmap -sV 192.168.1.45 - Run targeted scripts:
nmap --script=vuln 192.168.1.45 - Export results:
nmap -oX audit.xml 192.168.1.45
This simple loop forms the basis of most professional Nmap usage.
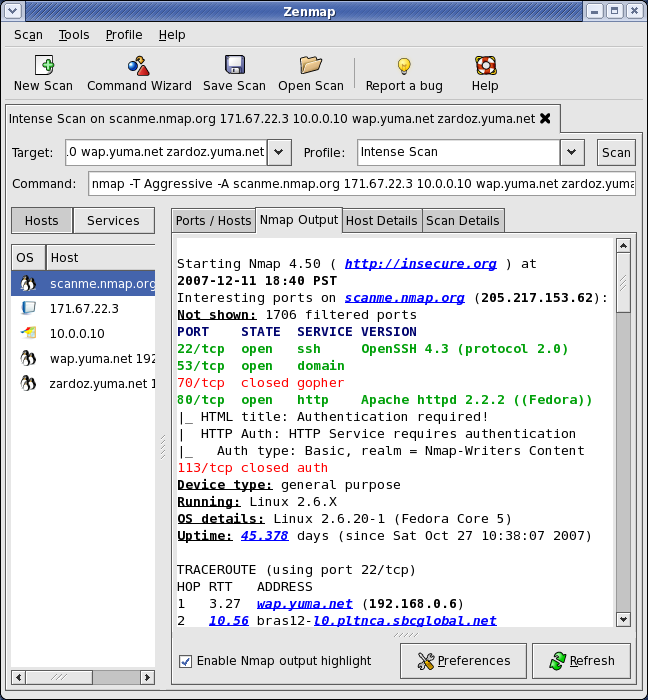
Zenmap, the GUI version, is still available, but most analysts rely on the CLI for automation and repeatability.
Common pitfalls and how to avoid them
Even experienced analysts run into these issues. Nmap is powerful, but it behaves differently depending on timing settings, target networks, and protocol quirks.
Here are some pitfalls that every team should be aware of.
- Scanning without scoping: Large networks can take hours to scan. Narrow your subnets before starting.
- Misreading UDP results: UDP scans often require repeats to confirm accuracy. Treat “open|filtered” with caution.
- Assuming version detection is exact: Some services obscure version banners for security. Always cross-reference with service behaviour.
- Ignoring IPv6: Attackers don’t. Many organisations forget they’re exposing IPv6 services by default.
- Using aggressive scans at the wrong time:
Acan overwhelm unstable hosts. Keep it for internal research, not production.
Nmap and the future of external attack surface intelligence
As seen in recent NPM supply-chain compromises like the Shai-Hulud attack, early visibility into exposed services and dependency paths can significantly reduce risk.
Nmap remains the backbone of many manual security assessments. But as networks scale, organisations need visibility that extends beyond one-off scans.
That’s where Nmap complements platforms like CybelAngel.
Nmap helps you validate what’s running on your own infrastructure. CybelAngel alerts you when exposed assets, leaked credentials, or misconfigurations appear anywhere across the internet (even on infrastructure you don’t realise you own yet).
Together, they give you both the depth and the breadth needed to stay ahead of opportunistic attackers.

Conclusion: Strengthening your threat intelligence workflow
Nmap gives you an honest view of your infrastructure. It shows which port numbers respond, which services answer, and which parts of your network remain visible to the outside world.
When combined with an OSINT framework and continuous threat intelligence, it becomes a reliable way to catch issues early.
To extend this work further, consider pairing Nmap outputs with automated external attack surface visibility. The combination helps teams understand both the assets they expect to see and the ones they don’t.
About the author